I actually made a tutorial on how I made my Aradiasprite’s fingers before since I was already asked to make one some time ago, but I never published it.
You’ll need some basic knowledge on sewing in order to properly follow this tutorial.
You’ll need:
- ~8 cm perimeter tubes that bend easily without losing their shape. I don’t know how to explain this better, but you’ll understand with the instructions
- White tights or leggings. Either is fine as long as they’re opaque~
- Molding paste. If it’s not white or of a similar color you’ll need to paint it white
- Clear cellophane tape
- Clear or white glue or vernish that you can apply with a brush
- Red paint
- Liquid latex
- White string, a sewing machine and sewing needles
- White permanent marker
- Scissors
- Clear nail polish
- More white fabric
- A brush and a paintbrush
- Waterproof plush filling in fibers
- A full water bottle. Use it to make attaching fingers/membranes to the frog hand easier.
Step by step:
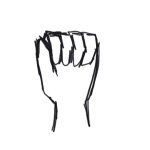
1. Cut two ~9 cm long tubes and one ~11 cm long tube.
2. At one end of each tube draw a small line, then draw the same line at the opposite side of the other end. Connect the ends drawing two diagonal lines between them, one that goes through the right side and one that goes through the left side.

3. Cut along the lines.
4. Make a cone with each half-tube by putting its sides together and surrounding them with cellophane tape. If your tube doesn’t keep it’s shape or it can’t bend until almost the end you chose the wrong kind of tube, so you’ll have to be careful when buying. In spite of this, at almost the end of each tube you won’t be able to bend it anymore even with the right kind of tube. You’ll just have to bend the tip so that it goes inside of the cone and put cellophane tape on it.

5. Use molding paste to make a ball in each cone’s tip. Let it dry, and paint it white depending of the colour of the modling paste you’re using.
6. Use the glue or the varnish to cover each ball’s tip. You’ll be able to erase traces of imperfect molding.
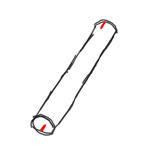
7. You’ll need an armsock tutorial for this. Make a pair of armsocks with your tights/leggings, BUT for the hand part you’ll be closing your fingers in an U shape while keeping the first part of them not bended at all. You’ll also have to keep your thumb pressed against your index finger’s U shape. This is so that your fingers are the least noticeable and your whole hand looks as Aradiasprite’s palm once you put in the armsocks.
8. Use the fabric that you have left from your tights/leggings to make covers for each of your frog fingers. When they’re finished put them into the fingers and use nail polish on their ends.
9. Attach your frog fingers to each of the armsock’s tips. You’ll be doing this one by one. First of all, you’ll need to attach a finger making big stitches and see if it’s in the place you want it to be or if it looks weird. When it looks fine, you’ll need to sew to attach it strongly so that it doesn’t move. You’ll have to make small stitches and going around the finger just once won’t be enough probably, so you’ll probably need to do this two times. Repeat for each finger, leaving a small space between them.
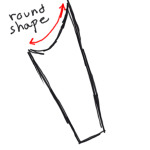
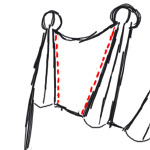
10. Using your frog hands, draw at the space between one of the side fingers and the middle finger at your white fabric, and give it rounded shape at it’s end, it will be the frog hand’s membrane pattern. Cut it.
11. Cut a piece of fabric in which you’ll be able to make six frog membranes. Using your paintbrush, spread the liquid latex (without forgetting to add water to it beforehand depending the kind you’ve bought) among the fabric, this way it’ll become stiff. Let it dry.
12. Cut each of the frog membranes using your pattern.
13. Using red paint and plush filling paint their sides or their ends, depending on your taste. You’ll probably want to add some dots here and there to make them look better.
14. Attach them to the fingers, sewing at the “wrong” side. It will be a pain to sew it and it’ll probably won’t look as if it can be sewn at all, but don’t give up!
And this is all! Here’s the final result:

I hope this tutorial is helpful! Message me if you have any questions~